

Android Task Reminder App [Source Code Included]
We offer you a brighter future with FREE online courses Start Now!!
In this tutorial, we will get through a simple but valuable Task reminder app using Android. Let’s dive into the project without wasting further time.
About Simple Task Reminder Application:
Do you tend to forget something, or do you need reminders for specific tasks? Then don’t worry; this app has got you covered. You can develop a simple task reminder app that can keep track of all your necessary tasks. It will also notify you about the job through notifications.
In this tutorial, you will learn to build a Simple Task Reminder App using Android Studio(Java and XML). Essential features of the reminder application are as follows:
1. Registering a new task and taking time and date to schedule the job.
2. Displaying all the tasks in the form of a list.
3. Keeping reminders for the task through notifications.
The flow of the Android Task Reminder App:
You should design a home screen with a list of reminders and a screen to take user input about his reminders. Below you can find a clear explanation of how the flow of the application should be:
1. Showing Reminders using Recycler View or List View.
2. Embedding a floating action button on the home screen. Using this, the user can add new tasks.
3. Adding reminders to Sqlite Database.
4. Setting the alarm Using Alarm Manager and Notification Manager.
5. Showing Notification using Notification Manager and pending Intent.
6. Updating the Manifest file with the necessary declarations and permissions.
Prerequisites of the Application:
You should be well aware of specific topics before you can start with the Android Task Reminder App. You are encouraged to have hands-on experience with Android Studio and its tools. Along with this, below are some of the technical stacks you should be aware of before starting the project.
1. Android Studio and its tools
2. XML designing and Resource Files
3. Object-Oriented Programming
4. Basic SQL knowledge
5. Android Activities
6. Java or Kotlin Programming
Download Android Task Reminder App Code
Please download the source code of android task reminder app: Task Reminder Android App Code
Description of the project:
When you are ready with all the prerequisites, then you are all set to get started. Here you will understand a few points about the recycler view, SQLite Database, Alarm Manager, and Notification Manager. Keeping the knowledge about all this will make your understanding clearer and complete the project’s implementation easy for you.
Below you can find a brief description of those sub-topics:
RecyclerView:
In Android, RecyclerView is a sophisticated and versatile version of ListView and GridView. It’s used for displaying plenty of knowledge sets that may be scrolled expeditiously by maintaining a restricted variety of views.
SQLite Database:
SQLite information is an ASCII text file electronic database. It allows you to perform the CRUD operations such as Create, Read, Update and delete.
Alarm Manager:
Android AlarmManager permits you to access the system alarm. With the assistance of AlarmManager, you’ll be able to schedule your tasks.
Notification Manager:
Notification Manager helps to place notifications into the status bar of your device. The user can expand the notification by going to the notification tray of your device.
Implementation of Reminder App in Android in Our Application:
There is a series that you need to follow to build this Android Task Reminder App. We are there to guide you through each step of the app creation.
1: Open your Android Studio and click on Create a Project.
2: Select Empty Activity and proceed.
3: Now, keep a name to your application and select Java and proceed.
4: Now, you need to browse the res —> layout —> open activity_main.xml. You need to define your design as follows.
Code: activity_main.xml
<?xml version=”1.0″ encoding=”utf-8″?>
<RelativeLayout xmlns:android=”http://schemas.android.com/apk/res/android”
xmlns:app=”http://schemas.android.com/apk/res-auto”
xmlns:tools=”http://schemas.android.com/tools”
android:layout_width=”match_parent”
android:background=”@color/lightblue”
android:layout_height=”match_parent”
tools:context=”.MainActivity”>
<androidx.recyclerview.widget.RecyclerView
android:id=”@+id/recyclerView”
android:layout_width=”match_parent”
android:layout_height=”match_parent” />
<com.google.android.material.floatingactionbutton.FloatingActionButton
android:id=”@+id/create_reminder”
android:layout_width=”wrap_content”
android:layout_height=”match_parent”
android:layout_alignParentEnd=”true”
android:layout_alignParentBottom=”true”
android:layout_gravity=”bottom”
android:layout_marginEnd=”30dp”
android:layout_marginBottom=”50dp”
android:src=”@drawable/plus_icon” />
</RelativeLayout>
5: Now open your Main Activity file and paste the below code.
Code: MainActivity.java
package com.dataflair.reminderapp;
import androidx.appcompat.app.AppCompatActivity;
import androidx.recyclerview.widget.LinearLayoutManager;
import androidx.recyclerview.widget.RecyclerView;
import android.content.Intent;
import android.database.Cursor;
import android.os.Bundle;
import android.view.View;
import com.google.android.material.floatingactionbutton.FloatingActionButton;
import java.util.ArrayList;
public class MainActivity extends AppCompatActivity {
FloatingActionButton mCreateRem;
RecyclerView mRecyclerview;
ArrayList<Model> dataholder = new ArrayList<Model>(); //Array list to add reminders and display in recyclerview
myAdapter adapter;
@Override
protected void onCreate(Bundle savedInstanceState) {
super.onCreate(savedInstanceState);
setContentView(R.layout.activity_main);
mRecyclerview = (RecyclerView) findViewById(R.id.recyclerView);
mRecyclerview.setLayoutManager(new LinearLayoutManager(getApplicationContext()));
mCreateRem = (FloatingActionButton) findViewById(R.id.create_reminder); //Floating action button to change activity
mCreateRem.setOnClickListener(new View.OnClickListener() {
@Override
public void onClick(View view) {
Intent intent = new Intent(getApplicationContext(), ReminderActivity.class);
startActivity(intent); //Starts the new activity to add Reminders
}
});
Cursor cursor = new dbManager(getApplicationContext()).readallreminders(); //Cursor To Load data From the database
while (cursor.moveToNext()) {
Model model = new Model(cursor.getString(1), cursor.getString(2), cursor.getString(3));
dataholder.add(model);
}
adapter = new myAdapter(dataholder);
mRecyclerview.setAdapter(adapter); //Binds the adapter with recyclerview
}
@Override
public void onBackPressed() {
finish(); //Makes the user to exit from the app
super.onBackPressed();
}
}
6: Now, you need to create two files. One will be the adapter class, and the other is your Modal Class. For this, you can right-click on your package and click on new, and then select Class.
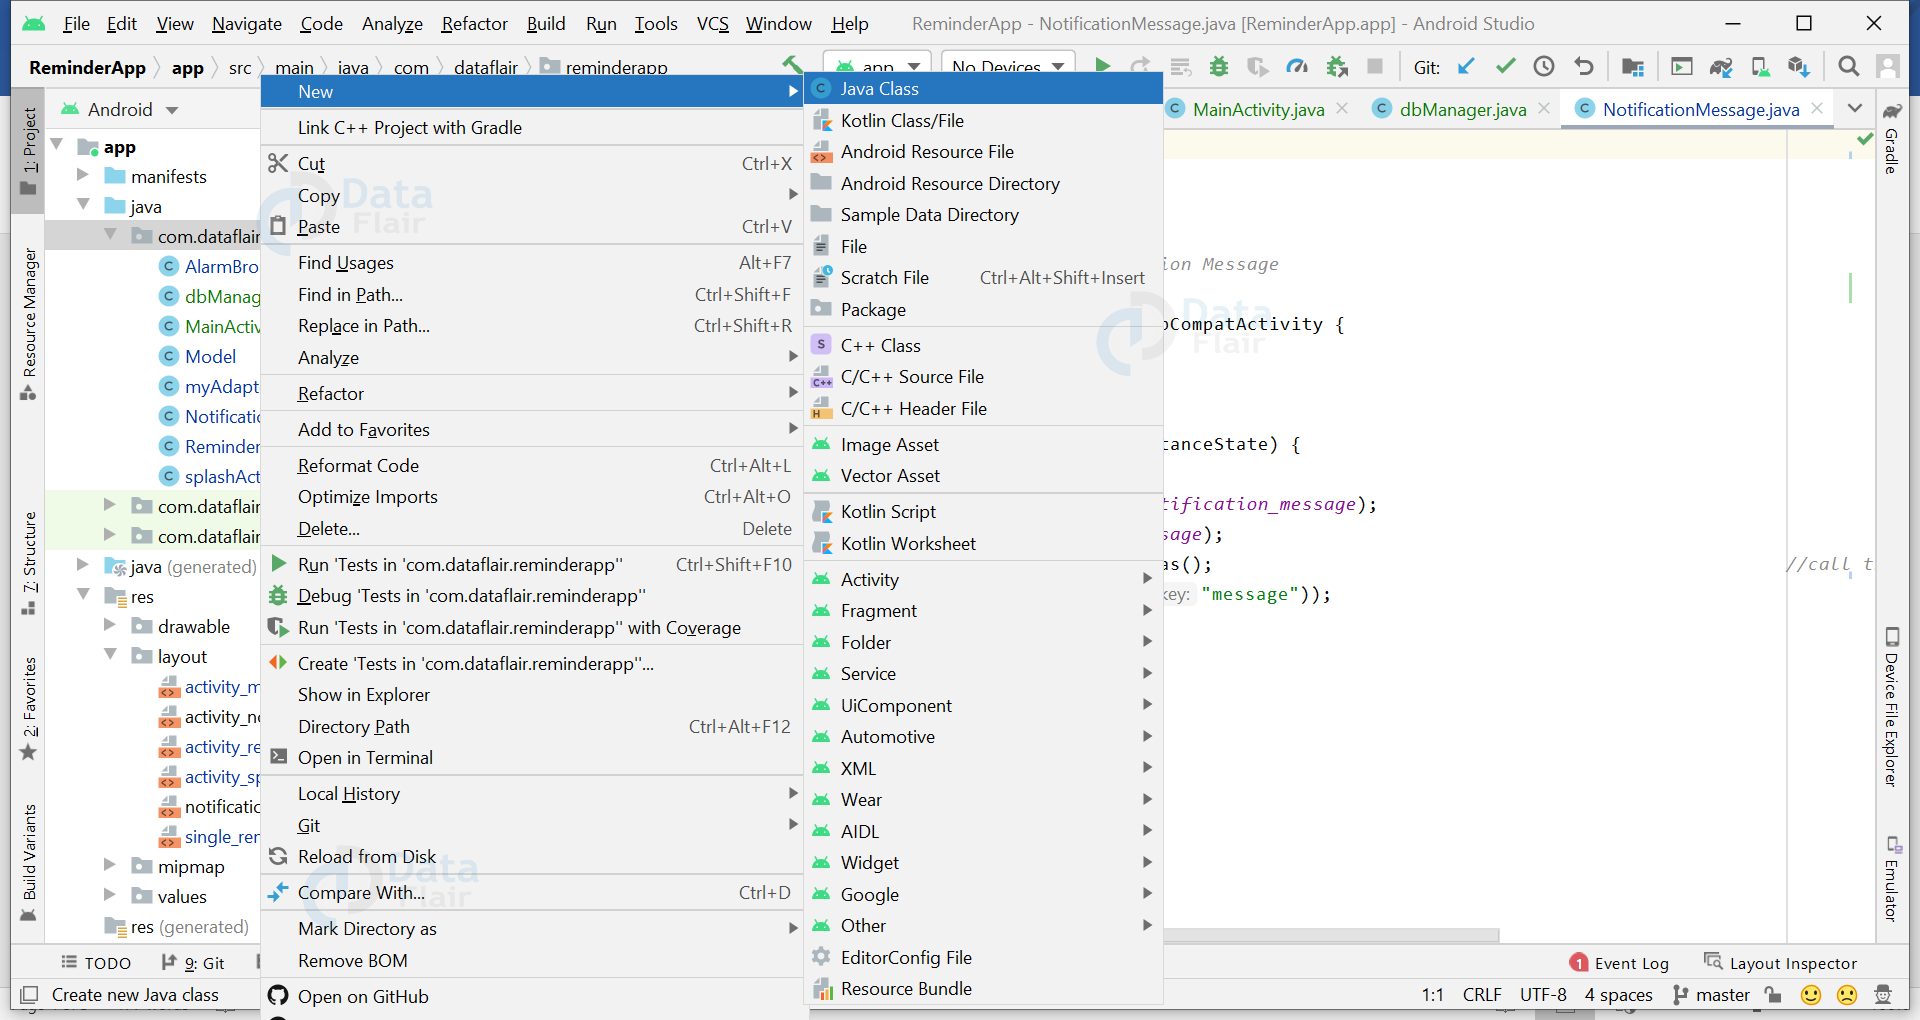
7: Now, you need to code your Modal Class. Below is the code which you can paste into your modal class.
Code: Model.java
package com.dataflair.reminderapp;
//model class is used to set and get the data from the database
public class Model {
String title, date, time;
public Model() {
}
public Model(String title, String date, String time) {
this.title = title;
this.date = date;
this.time = time;
}
public String getTitle() {
return title;
}
public void setTitle(String title) {
this.title = title;
}
public String getDate() {
return date;
}
public void setDate(String date) {
this.date = date;
}
public String getTime() {
return time;
}
public void setTime(String time) {
this.time = time;
}
}
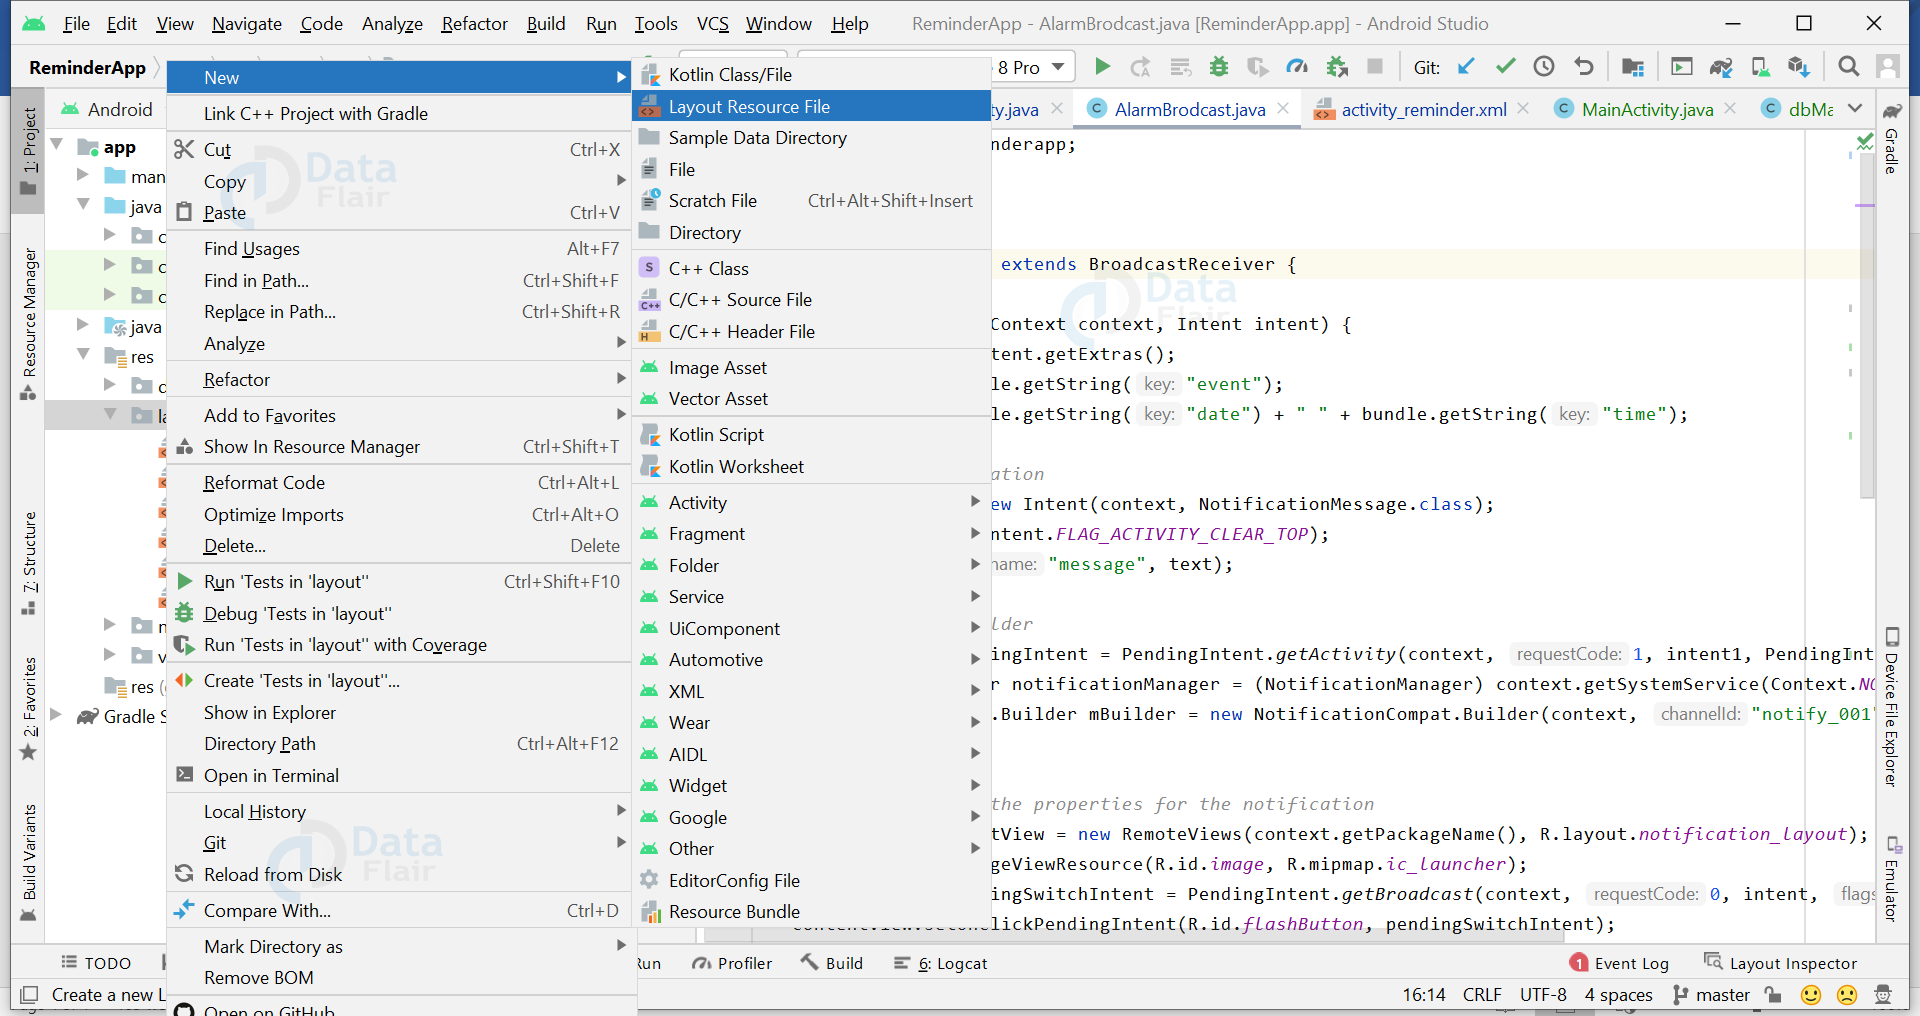
8: Now, you need to create a layout for each item in the recycler view list. So for this, go to res —> design and right-click. Then click new and select Layout Resource File. After this name the file as single_reminder_file.xml
Code: single_reminder_file.xml
<LinearLayout
android:layout_width=”match_parent”
android:layout_height=”match_parent”
android:background=”@color/white”
android:orientation=”vertical”>
<TextView
android:id=”@+id/txtTitle”
android:layout_width=”wrap_content”
android:layout_height=”wrap_content”
android:text=”Title”
android:textSize=”20dp”
android:textStyle=”bold” />
<TextView
android:id=”@+id/txtDate”
android:layout_width=”wrap_content”
android:layout_height=”wrap_content”
android:text=”Date”
android:textSize=”20dp”
android:textStyle=”italic” />
<TextView
android:id=”@+id/txtTime”
android:layout_width=”wrap_content”
android:layout_height=”wrap_content”
android:text=”Time”
android:textSize=”20dp”
android:textStyle=”italic” />
</LinearLayout>
</androidx.cardview.widget.CardView>
10: Now, you need to add the reminder on your SQLite Database. For this, create a new empty activity called a Reminder.
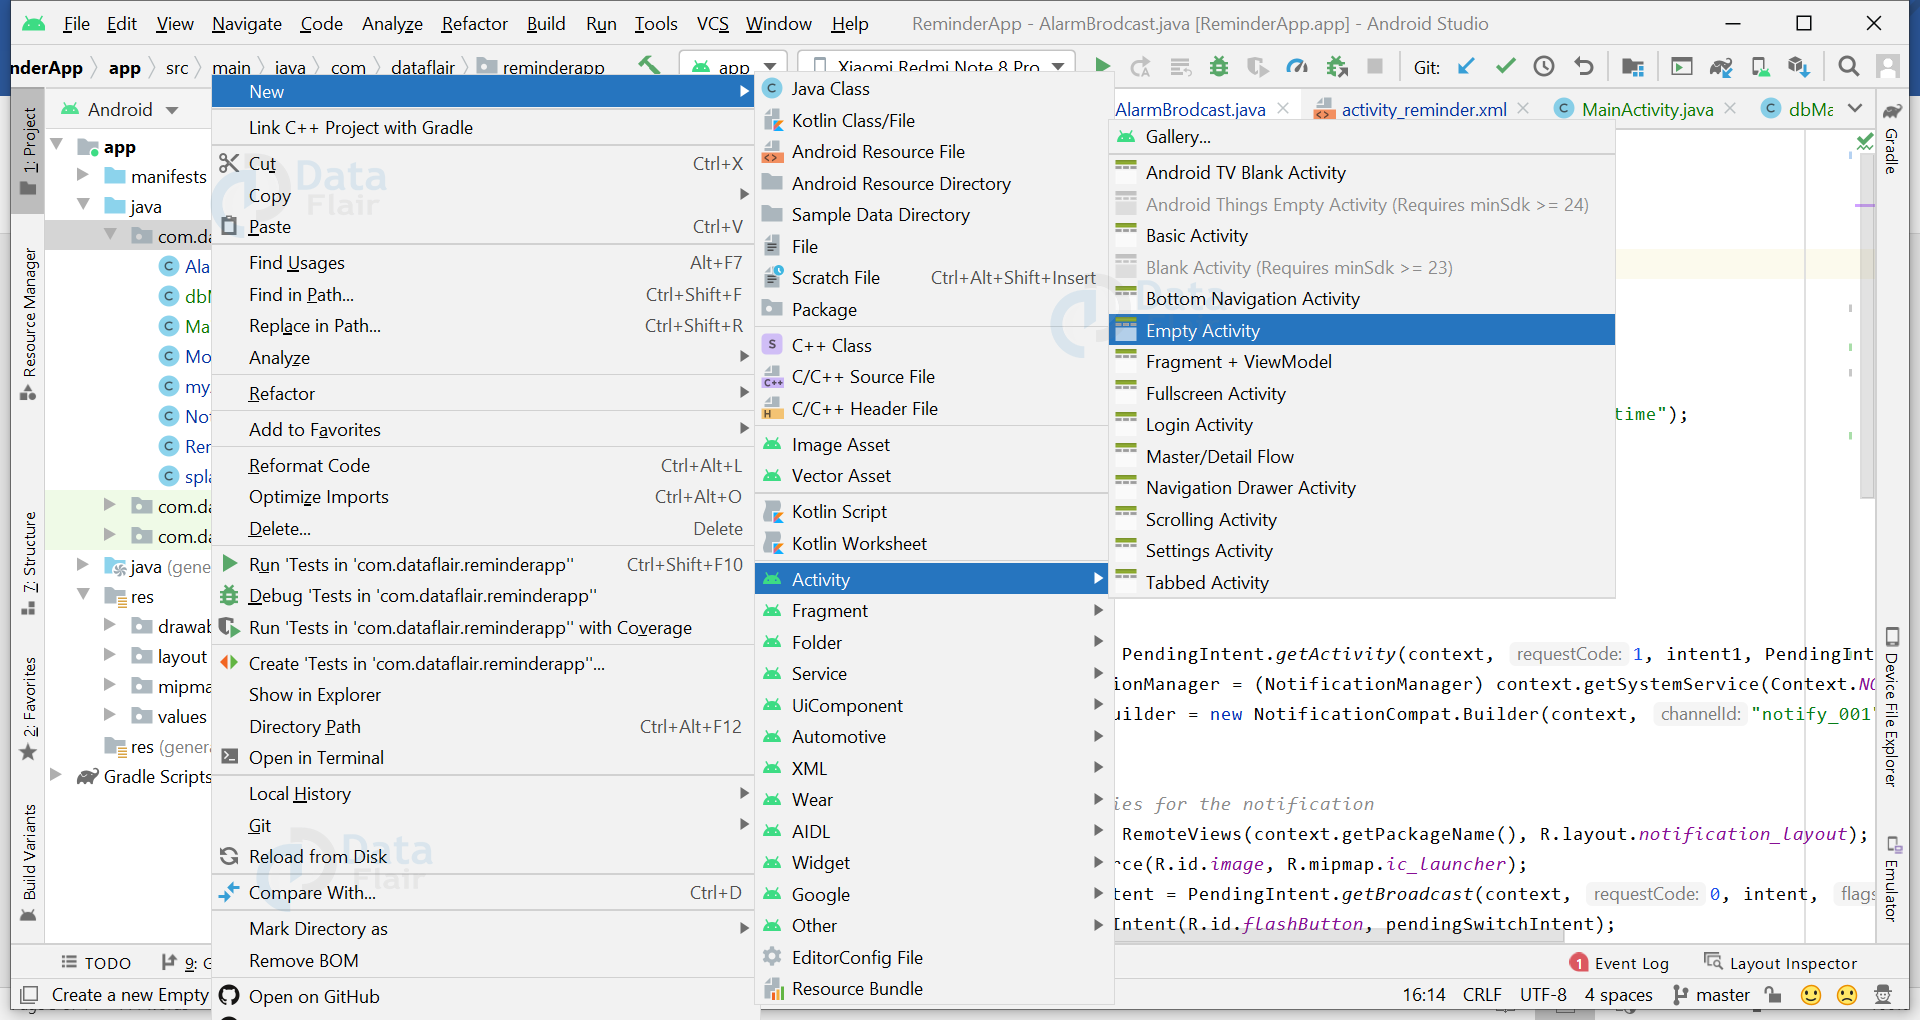
11: Paste the below code in your activity_reminder.xml file.
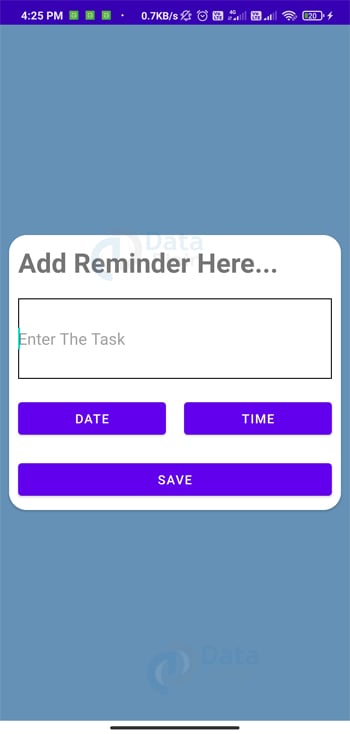
Code: activity_reminder.xml
<?xml version=”1.0″ encoding=”utf-8″?>
<LinearLayout xmlns:android=”http://schemas.android.com/apk/res/android”
xmlns:app=”http://schemas.android.com/apk/res-auto”
xmlns:tools=”http://schemas.android.com/tools”
android:layout_width=”match_parent”
android:background=”@color/lightblue”
android:layout_height=”match_parent”
android:gravity=”center”
android:orientation=”vertical”
app:backgroundTint=”@null”
tools:context=”.ReminderActivity”>
<androidx.cardview.widget.CardView
android:layout_width=”match_parent”
android:layout_height=”wrap_content”
android:layout_margin=”10dp”
app:cardCornerRadius=”20dp”>
<LinearLayout
android:layout_width=”match_parent”
android:layout_height=”match_parent”
android:background=”@color/cardwhite”
android:orientation=”vertical”
app:backgroundTint=”@null”>
<TextView
android:layout_width=”wrap_content”
android:layout_height=”wrap_content”
android:text=”Add Reminder Here…”
android:textSize=”30dp”
android:textStyle=”bold”
android:layout_margin=”10dp”/>
<EditText
android:id=”@+id/editTitle”
android:layout_width=”match_parent”
android:layout_height=”90dp”
android:layout_margin=”10dp”
android:background=”@drawable/edit_background”
android:hint=”Enter The Task” />
<LinearLayout
android:layout_width=”match_parent”
android:layout_height=”wrap_content”
android:orientation=”horizontal”>
<Button
android:id=”@+id/btnDate”
android:layout_width=”wrap_content”
android:layout_height=”wrap_content”
android:layout_margin=”10dp”
android:layout_weight=”0.5″
android:text=”date” />
<Button
android:id=”@+id/btnTime”
android:layout_width=”wrap_content”
android:layout_height=”wrap_content”
android:layout_margin=”10dp”
android:layout_weight=”0.5″
android:text=”time” />
</LinearLayout>
<Button
android:id=”@+id/btnSubmit”
android:layout_width=”match_parent”
android:layout_height=”wrap_content”
android:layout_margin=”10dp”
android:text=”Save” />
</LinearLayout>
</androidx.cardview.widget.CardView>
</LinearLayout>
12: Now, you need to open the ReminderActivity.java file. Here, paste the below code.
Code: ReminderActivity.java
package com.dataflair.reminderapp;
import androidx.appcompat.app.AppCompatActivity;
import android.app.AlarmManager;
import android.app.DatePickerDialog;
import android.app.PendingIntent;
import android.app.TimePickerDialog;
import android.content.Context;
import android.content.Intent;
import android.os.Bundle;
import android.view.View;
import android.widget.Button;
import android.widget.DatePicker;
import android.widget.EditText;
import android.widget.TimePicker;
import android.widget.Toast;
import java.text.DateFormat;
import java.text.ParseException;
import java.text.SimpleDateFormat;
import java.util.Calendar;
import java.util.Date;
//this class is to take the reminders from the user and inserts into the database
public class ReminderActivity extends AppCompatActivity {
Button mSubmitbtn, mDatebtn, mTimebtn;
EditText mTitledit;
String timeTonotify;
@Override
protected void onCreate(Bundle savedInstanceState) {
super.onCreate(savedInstanceState);
setContentView(R.layout.activity_reminder);
mTitledit = (EditText) findViewById(R.id.editTitle);
mDatebtn = (Button) findViewById(R.id.btnDate); //assigned all the material reference to get and set data
mTimebtn = (Button) findViewById(R.id.btnTime);
mSubmitbtn = (Button) findViewById(R.id.btnSubmit);
mTimebtn.setOnClickListener(new View.OnClickListener() {
@Override
public void onClick(View view) {
selectTime(); //when we click on the choose time button it calls the select time method
}
});
mDatebtn.setOnClickListener(new View.OnClickListener() {
@Override
public void onClick(View view) {
selectDate();
} //when we click on the choose date button it calls the select date method
});
mSubmitbtn.setOnClickListener(new View.OnClickListener() {
@Override
public void onClick(View view) {
String title = mTitledit.getText().toString().trim(); //access the data from the input field
String date = mDatebtn.getText().toString().trim(); //access the date from the choose date button
String time = mTimebtn.getText().toString().trim(); //access the time from the choose time button
if (title.isEmpty()) {
Toast.makeText(getApplicationContext(), “Please Enter text”, Toast.LENGTH_SHORT).show(); //shows the toast if input field is empty
} else {
if (time.equals(“time”) || date.equals(“date”)) { //shows toast if date and time are not selected
Toast.makeText(getApplicationContext(), “Please select date and time”, Toast.LENGTH_SHORT).show();
} else {
processinsert(title, date, time);
}
}
}
});
}
private void processinsert(String title, String date, String time) {
String result = new dbManager(this).addreminder(title, date, time); //inserts the title,date,time into sql lite database
setAlarm(title, date, time); //calls the set alarm method to set alarm
mTitledit.setText(“”);
Toast.makeText(getApplicationContext(), result, Toast.LENGTH_SHORT).show();
}
private void selectTime() { //this method performs the time picker task
Calendar calendar = Calendar.getInstance();
int hour = calendar.get(Calendar.HOUR_OF_DAY);
int minute = calendar.get(Calendar.MINUTE);
TimePickerDialog timePickerDialog = new TimePickerDialog(this, new TimePickerDialog.OnTimeSetListener() {
@Override
public void onTimeSet(TimePicker timePicker, int i, int i1) {
timeTonotify = i + “:” + i1; //temp variable to store the time to set alarm
mTimebtn.setText(FormatTime(i, i1)); //sets the button text as selected time
}
}, hour, minute, false);
timePickerDialog.show();
}
private void selectDate() { //this method performs the date picker task
Calendar calendar = Calendar.getInstance();
int year = calendar.get(Calendar.YEAR);
int month = calendar.get(Calendar.MONTH);
int day = calendar.get(Calendar.DAY_OF_MONTH);
DatePickerDialog datePickerDialog = new DatePickerDialog(this, new DatePickerDialog.OnDateSetListener() {
@Override
public void onDateSet(DatePicker datePicker, int year, int month, int day) {
mDatebtn.setText(day + “-” + (month + 1) + “-” + year); //sets the selected date as test for button
}
}, year, month, day);
datePickerDialog.show();
}
public String FormatTime(int hour, int minute) { //this method converts the time into 12hr format and assigns am or pm
String time;
time = “”;
String formattedMinute;
if (minute / 10 == 0) {
formattedMinute = “0” + minute;
} else {
formattedMinute = “” + minute;
}
if (hour == 0) {
time = “12” + “:” + formattedMinute + ” AM”;
} else if (hour < 12) {
time = hour + “:” + formattedMinute + ” AM”;
} else if (hour == 12) {
time = “12” + “:” + formattedMinute + ” PM”;
} else {
int temp = hour – 12;
time = temp + “:” + formattedMinute + ” PM”;
}
return time;
}
private void setAlarm(String text, String date, String time) {
AlarmManager am = (AlarmManager) getSystemService(Context.ALARM_SERVICE); //assigning alarm manager object to set alarm
Intent intent = new Intent(getApplicationContext(), AlarmBrodcast.class);
intent.putExtra(“event”, text); //sending data to alarm class to create channel and notification
intent.putExtra(“time”, date);
intent.putExtra(“date”, time);
PendingIntent pendingIntent = PendingIntent.getBroadcast(getApplicationContext(), 0, intent, PendingIntent.FLAG_ONE_SHOT);
String dateandtime = date + ” ” + timeTonotify;
DateFormat formatter = new SimpleDateFormat(“d-M-yyyy hh:mm”);
try {
Date date1 = formatter.parse(dateandtime);
am.set(AlarmManager.RTC_WAKEUP, date1.getTime(), pendingIntent);
Toast.makeText(getApplicationContext(), “Alarm”, Toast.LENGTH_SHORT).show();
} catch (ParseException e) {
e.printStackTrace();
}
Intent intentBack = new Intent(getApplicationContext(), MainActivity.class); //this intent will be called once the setting alarm is complete
intentBack.setFlags(Intent.FLAG_ACTIVITY_NEW_TASK | Intent.FLAG_ACTIVITY_CLEAR_TASK);
startActivity(intentBack); //navigates from adding reminder activity to mainactivity
}
}
13: Now, you need to create a Database Manager that will help you to connect your application to the SQLite Database. Using the database manager, you can execute all your SQL queries. For this, create a dbManager.java file and paste the below code.
Code: dbManager.java
package com.dataflair.reminderapp;
import android.content.ContentValues;
import android.content.Context;
import android.database.Cursor;
import android.database.sqlite.SQLiteDatabase;
import android.database.sqlite.SQLiteOpenHelper;
import androidx.annotation.Nullable;
public class dbManager extends SQLiteOpenHelper {
private static String dbname = “reminder”; //Table name to store reminders in sqllite
public dbManager(@Nullable Context context) {
super(context, dbname, null, 1);
}
@Override
public void onCreate(SQLiteDatabase sqLiteDatabase) { //sql query to insert data in sqllite
String query = “create table tbl_reminder(id integer primary key autoincrement,title text,date text,time text)”;
sqLiteDatabase.execSQL(query);
}
@Override
public void onUpgrade(SQLiteDatabase sqLiteDatabase, int i, int i1) {
String query = “DROP TABLE IF EXISTS tbl_reminder”; //sql query to check table with the same name or not
sqLiteDatabase.execSQL(query); //executes the sql command
onCreate(sqLiteDatabase);
}
public String addreminder(String title, String date, String time) {
SQLiteDatabase database = this.getReadableDatabase();
ContentValues contentValues = new ContentValues();
contentValues.put(“title”, title); //Inserts data into sqllite database
contentValues.put(“date”, date);
contentValues.put(“time”, time);
float result = database.insert(“tbl_reminder”, null, contentValues); //returns -1 if data successfully inserts into database
if (result == -1) {
return “Failed”;
} else {
return “Successfully inserted”;
}
}
public Cursor readallreminders() {
SQLiteDatabase database = this.getWritableDatabase();
String query = “select * from tbl_reminder order by id desc”; //Sql query to retrieve data from the database
Cursor cursor = database.rawQuery(query, null);
return cursor;
}
}
14: Now, you need to set up the Alarm Manager for your application and register the broadcast receiver. Create a java class called AlarmBroadcast.java and paste the below code in your file.
Code: AlarmBroadcast.java
package com.dataflair.reminderapp;
import android.app.Notification;
import android.app.NotificationChannel;
import android.app.NotificationManager;
import android.app.PendingIntent;
import android.content.BroadcastReceiver;
import android.content.Context;
import android.content.Intent;
import android.os.Build;
import android.os.Bundle;
import android.widget.RemoteViews;
import androidx.core.app.NotificationCompat;
public class AlarmBroadcast extends BroadcastReceiver {
@Override
public void onReceive(Context context, Intent intent) {
Bundle bundle = intent.getExtras();
String text = bundle.getString(“event”);
String date = bundle.getString(“date”) + ” ” + bundle.getString(“time”);
//Click on Notification
Intent intent1 = new Intent(context, NotificationMessage.class);
intent1.addFlags(Intent.FLAG_ACTIVITY_CLEAR_TOP);
intent1.putExtra(“message”, text);
//Notification Builder
PendingIntent pendingIntent = PendingIntent.getActivity(context, 1, intent1, PendingIntent.FLAG_ONE_SHOT);
NotificationManager notificationManager = (NotificationManager) context.getSystemService(Context.NOTIFICATION_SERVICE);
NotificationCompat.Builder mBuilder = new NotificationCompat.Builder(context, “notify_001”);
//here we set all the properties for the notification
RemoteViews contentView = new RemoteViews(context.getPackageName(), R.layout.notification_layout);
contentView.setImageViewResource(R.id.image, R.mipmap.ic_launcher);
PendingIntent pendingSwitchIntent = PendingIntent.getBroadcast(context, 0, intent, 0);
contentView.setOnClickPendingIntent(R.id.flashButton, pendingSwitchIntent);
contentView.setTextViewText(R.id.message, text);
contentView.setTextViewText(R.id.date, date);
mBuilder.setSmallIcon(R.drawable.alarm);
mBuilder.setAutoCancel(true);
mBuilder.setOngoing(true);
mBuilder.setAutoCancel(true);
mBuilder.setPriority(Notification.PRIORITY_HIGH);
mBuilder.setOnlyAlertOnce(true);
mBuilder.build().flags = Notification.FLAG_NO_CLEAR | Notification.PRIORITY_HIGH;
mBuilder.setContent(contentView);
mBuilder.setContentIntent(pendingIntent);
//we have to create notification channel after api level 26
if (Build.VERSION.SDK_INT >= Build.VERSION_CODES.O) {
String channelId = “channel_id”;
NotificationChannel channel = new NotificationChannel(channelId, “channel name”, NotificationManager.IMPORTANCE_HIGH);
channel.enableVibration(true);
notificationManager.createNotificationChannel(channel);
mBuilder.setChannelId(channelId);
}
Notification notification = mBuilder.build();
notificationManager.notify(1, notification);
}
}
15: Now, you need to set up the Notification Manager for your application. For this, you need to create a new activity called Notification Message.
16: Open the notification_layout.xml file and paste the below code.
Code: notification_layout.xml
<?xml version=”1.0″ encoding=”utf-8″?>
<LinearLayout xmlns:android=”http://schemas.android.com/apk/res/android”
android:layout_width=”match_parent”
android:layout_height=”wrap_content”>
<RelativeLayout xmlns:android=”http://schemas.android.com/apk/res/android”
android:id=”@+id/layout”
android:layout_width=”fill_parent”
android:layout_height=”64dp”
android:padding=”10dp”>
<Button
android:id=”@+id/flashButton”
android:layout_width=”wrap_content”
android:layout_height=”50dp”
android:layout_alignParentRight=”true”
android:layout_centerVertical=”true”
android:text=”Snozz off” />
<ImageView
android:id=”@+id/icon”
android:layout_width=”60dp”
android:layout_height=”45dp”
android:layout_alignParentLeft=”true”
android:layout_marginLeft=”-10dp”
android:layout_marginTop=”5dp”
android:layout_marginBottom=”5dp”
android:src=”@mipmap/ic_launcher” />
<RelativeLayout
android:layout_width=”wrap_content”
android:layout_height=”wrap_content”
android:layout_centerVertical=”true”
android:layout_toRightOf=”@+id/icon”>
<TextView
android:id=”@+id/message”
android:layout_width=”wrap_content”
android:layout_height=”wrap_content”
android:layout_alignParentLeft=”true”
android:text=”Flashlight”
android:textColor=”#000000″
android:textSize=”13sp” />
<TextView
android:id=”@+id/date”
android:layout_width=”wrap_content”
android:layout_height=”wrap_content”
android:layout_below=”@+id/message”
android:layout_alignParentLeft=”true”
android:layout_marginTop=”3dp”
android:text=”90% Charging”
android:textColor=”#000000″
android:textSize=”13sp” />
</RelativeLayout>
</RelativeLayout>
</LinearLayout>
17: Now open your NotificationMessage.java class and paste the below code.
Code: NotificationMessage.java
package com.dataflair.reminderapp;
import android.os.Bundle;
import android.widget.TextView;
import androidx.appcompat.app.AppCompatActivity;
//this class creates the Reminder Notification Message
public class NotificationMessage extends AppCompatActivity {
TextView textView;
@Override
protected void onCreate(Bundle savedInstanceState) {
super.onCreate(savedInstanceState);
setContentView(R.layout.activity_notification_message);
textView = findViewById(R.id.tv_message);
Bundle bundle = getIntent().getExtras(); //call the data which is passed by another intent
textView.setText(bundle.getString(“message”));
}
}
18: Now, as the last step, you need to edit your Manifest File. Here you need to add some permissions and some declarations. You can paste the below code in your manifest file.
Code: AndroidMainfest.xml
<?xml version=”1.0″ encoding=”utf-8″?>
<manifest xmlns:android=”http://schemas.android.com/apk/res/android”
package=”com.dataflair.reminderapp”>
<uses-permission android:name=”android.permission.SYSTEM_ALERT_WINDOW” />
<application
android:allowBackup=”true”
android:icon=”@drawable/data_flair”
android:label=”@string/app_name”
android:roundIcon=”@drawable/data_flair”
android:supportsRtl=”true”
android:theme=”@style/Theme.ReminderApp”>
<activity android:name=”com.dataflair.reminderapp.splashActivity”>
<intent-filter>
<action android:name=”android.intent.action.MAIN” />
<category android:name=”android.intent.category.LAUNCHER” />
</intent-filter>
</activity>
<activity android:name=”com.dataflair.reminderapp.ReminderActivity” />
<activity android:name=”com.dataflair.reminderapp.MainActivity”>
</activity>
<receiver android:name=”com.dataflair.reminderapp.AlarmBroadcast” />
</application>
</manifest>
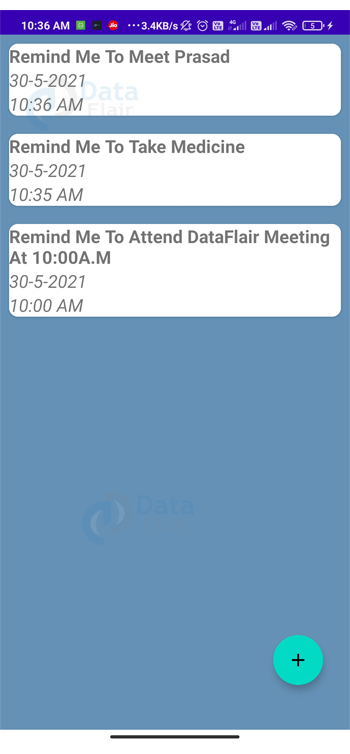
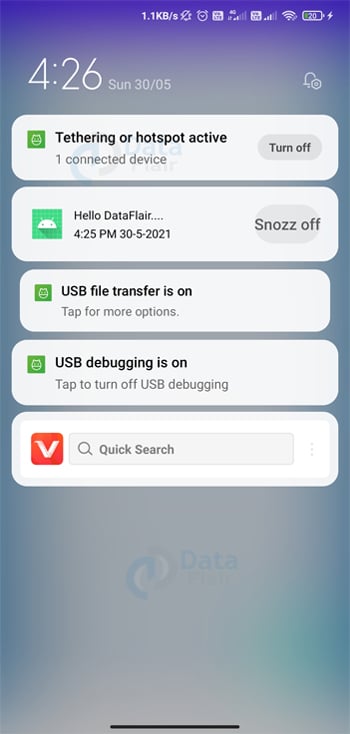
The Android Task Reminder App building is done, and you can go ahead to test it. Just click on the run button, and then you can notice the output as follows
Android Task Reminder App Output
1. Home Screen:
2. Add Reminders Screen:
3. Task Notification:
Summary
Through this article, you saw what a reminder application is. You came across the features of a simple reminder application. Moving forth you got to know the flow, prerequisites, and the description of the project. Finally, you came across an implementation of the entire Android Task Reminder App. I hope you got thrilled with the application and would share your application with your friends and family.
Did we exceed your expectations?
If Yes, share your valuable feedback on Google
Fonte: https://data-flair.training/blogs/android-task-reminder-app/